Mono Conversions

The example below show how much more effective a simple image can be with a monochrome conversion.

Hopefully by the wonders of modern science you should be able to move your mouse over the image below (grab and drag the little handle) and see a before/after example of the original image with nothing done to it (other than a slight crop), and then the ‘after’ image with a little TLC applied. What’s been done? Actually on this one not that much.

  • Cloned out the plastic bag
  • Converted to mono
  • Localised exposure adjustments to bring up some shadow detail

Move the slider to the left to reveal the ‘before’ image..

Never leave home without it..

Here’s another before/after example illustrating the benefit of using a circular polariser:

Move the slider to the right to reveal the ‘after’ image with the polariser..

Note, other than the crop and adding the copyright text, these images are both straight out of camera. The only difference between the two was the use of the polariser.

If you’re looking to buy a polariser, in my opinion you can’t beat the ones made by B+W. I use their top-end ‘Kaesmann’ filter, which isn’t cheap but it really is the Rolls Royce of polarisers. Here are a couple of recommendations for you, with Amazon Links:

Hoya Pro-1 (minimum spec I’d recommend for beginners)
Hoya HD Digital Circular Polarizing Filter (better)
B + W Circular Polarizer Filter With Multi Resistant Coating (pro-spec)
B+W Kaesemann (The best imho!)

In the news…

Here’s a little write-up in the Gloucester Gazette about my talk at Tyndale Photography Club last week.

CCTalk-Web

Tyndale Photography Club

I had another very enjoyable evening yesterday presenting a talk on digital workflow and editing techniques to the Tyndale Photographic Club in North Nibley.  They always make me feel very welcome, and it’s nice to have a group who are open to new ideas and who’ll ask plenty of questions! :-)

A couple of people asked about the little rugged backup drive I mentioned in my talk, so I thought I’d include a link for you to make things easier. I’ve added a little Amazon ‘web store’ where I’ll share some useful product links etc.

Click here: [button link=”http://astore.amazon.co.uk/richardolpinphotography-21″ style=”info” color=”#8080ff” text=”grey”]Amazon Web Store[/button]

You can add them straight to your regular amazon account from this and check out as normal.

Hope that’s useful!

Work Experience Requests

Recently I’ve been getting a lot of requests from students asking about work experience with me.

I’m afraid in the majority of cases this really isn’t possible right now.

The key thing that prevents this is simply the fact that whilst I am a semi-professional photographer, that’s is only part of what I do, and therefore I don’t work to regular hours and can’t really predict what I’m going to be doing at any particular time.  I don’t run a full time studio, I work from home or rent studios if I need one for a specific shoot (see my Flickr for recent examples).  Most of my photographic income actually comes from teaching others which is mostly in the form of specific one-to-one training days and location workshops.

If you’re looking for specific technical training then of course I can probably help there, and I do offer occasional discounts to photography students, especially if we can fit some training for you in around otherwise quiet times so please feel free to get in touch if you’d like to discuss that.
I’m always very happy to offer general advice to aspiring photographers though and I’d invite you to register on my forum where you can ask questions, join the discussions and take part in projects etc. with the other forum members.
Sorry I can’t be more help, but do keep in touch and good luck with your photography!

Keeping it in the family

Julia and Kate

Had a cracking day out yesterday with a couple of lovely ladies, mum and daughter, Julia and Kate.

They’d both been given SLRs as presents from their respective hubbies, and thought it was about time they learned how to use them.

Whilst early on in the day we were a little restricted by the foggy weather we managed to cover a lot and by the end of the day both girls were taking some super shots.

Here’s a little quote from a mail I received from Julia earlier..

Just a quick thank-you for a brilliant day yesterday.

Kate and I thoroughly enjoyed the training day, in spite of the cold weather. We both learnt an incredible amount, you are a very good and patient teacher. We both felt much more confident to use our cameras, and to see what you can achieve with a relatively short amount of time and a bit of editing, we were amazed!

Thanks Julia!


Shooting in a winter wonderland

snow-9643

Winter can provide some excellent new photo opportunities with the arrival of frosty mornings, snow and ice.  A once-familiar landscape can take on an entirely different look overnight.

If you’re like me, you’re probably planning to venture out and shoot some photos but before you do, here are a few quick tips to help you make the most of the conditions.

Equipment:

In the UK we don’t generally get it so cold that a camera won’t function, but there are a couple of important considerations:

Firstly, when you head out into the cold you should allow your camera a few minutes to adjust to the colder temperature. If it’s been stored in a typical centrally heated house it’s likely to mist up and that’s not going to lead to nice shots!

You should also be aware that batteries won’t perform as well in the cold either, and it’s likely you’ll find them running out much quicker.  What I usually do is to keep a spare in an inside pocket where it will stay warm. If you do find yourself caught out with a flat battery, it’s worth putting it in your pocket for a while as you’ll often find if it’s warmed up a bit you may get a few more shots out of it.  Please don’t try and warm it up on a heater or anything though as that could well end up damaging the battery!

Exposure compensation:

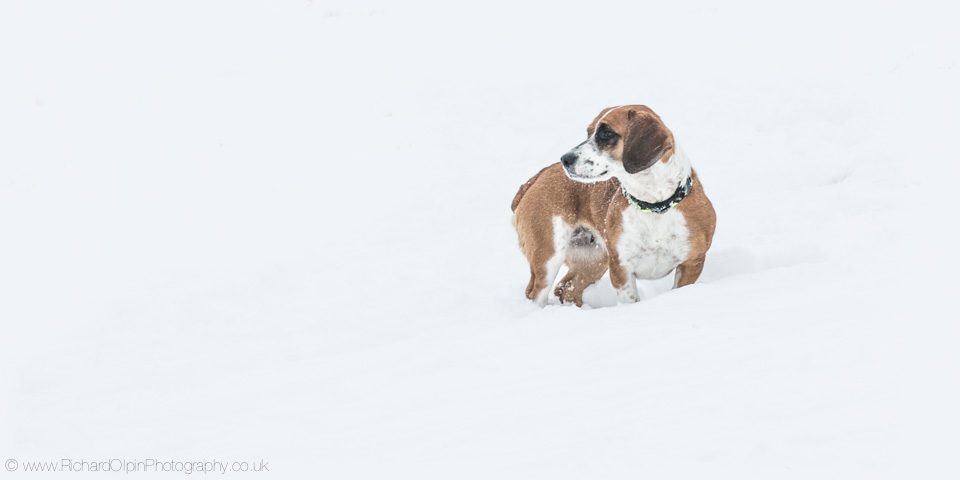
When most of the scene is snow you’ll need to adjust your exposure by about 1-2 stops to ensure the snow appears pure white.  

The main problem with snow is that its pure white and highly reflective which confuses the camera’s metering system.  Modern cameras have highly sophisticated electronic metering systems that deliver excellent results for a scene with a normal range of contrast. They do this by averaging the range of tones in the image and adjusting until the brightness is mid-grey. This works well when the subject has a wide tonal range with everything from black to white being present, but when it is very bright such as snow the camera underexposes so that the white becomes grey.

This is the classic example where you need to override the camera’s metering and adjust the exposure using the exposure compensation control, or by manually adjusting your shutter speed or aperture in manual.  You’ll usually find an adjustment of about 1.5 stops will be about right, but if in doubt try a couple of bracketed shots at 0, +1 and +2 stops and check them against your histogram display to get a feel for how your particular camera performs.

A nice cup of tea and a sit down…

Over the winter months it’s not always easy to get out and shoot so it’s a great time to take advantage of all that time stuck indoors to develop your digital darkroom skills and learn some new post-processing techniques etc.

I’ve had a few training enquiries recently from people who were pretty good photographers, but really felt overwhelmed by the complexity of the latest software packages and they simply didn’t know where to start.

Maybe I can help?

I am unashamedly a digital photographer, and over the years I’ve gained a lot of experience in digital imaging and post-processing techniques.  My software training, as with all my one-to-one teaching will be tailored to your individual requirements, whether that be to learn some basic editing skills, right through to implement a full digital asset management workflow from scratch.

Typical topics might include:

  • Choosing the right software packages to suit your needs
  • Importing your photos and organising your image library
  • Working with RAW files
  • Basic techniques (Cropping / straightening / resizing)
  • Digital Darkroom techniques (Exposure / Contrast / Colour corrections)
  • Monochrome Conversions
  • Sharpening / noise reduction
  • Preparing files for professional printing

Advanced topics

  • Photo stitching / digital panoramas
  • HDR Processing
  • Portrait retouching (‘Airbrushing’)
  • Digital Photo Restoration: Bring Old Photos Back to Life

Training Clients Gallery

By popular request, I’ve added a quick page with a few sample images taken by training clients on workshops and one-to-one training days.  There are just a few images for now, I’ll add more later!

You can see the gallery under the training section, or just take a look at http://www.richardolpin.co.uk/training-clients-gallery/ 

Work Experience

A had something of an unusual week last month in that I had a work-experience student with me.  Alana was a friend-of-a-friend that I’d met when I shot a wedding earlier in the year and as she was studying A-level photography she’d asked if there was any possibility of spending some time with me to see how a ‘pro’ did things.

We had some pretty gnarly weather to contend with but still managed to fill our week with tutorials and workshop style shoots.  Alana is a natural with a good eye and clearly very interested in photography so it was an interesting week for me too and a lot of fun.

Here’s what she had to say about her week with me:

“Spent an absolutely amazing work experience with Rich, we spent the week covering as many elements of photography as we could – despite the awful weather of this years so called summer .

This week taught me more of the practical and technical side of photography, than my whole first year at A-level. If you’re passionate about photography and wish to develop them further Rich is an awesome teacher and has really inspired me to try out new ideas.He explains things in great detail as well as giving you visual examples to help your understanding.

The week allowed me to practice my photography skills and in a variety of different settings and types of photography.

I got some amazing results from some street photography around Bristol , natural portrait shoot, Bristol zoo , and some black and white shots of the old severn bridge. I also learnt various editing skills in different software packages so as i could improve my photos after I had taken them.

To anyone who would love to progress their skills with amazing photographic settings and opportunities I really recommend booking up some lessons with Rich. I guarantee you will see a massive difference in your abilities.”

Can’t say fairer than that can I.  Thanks!

[hr]

I’ll add a small gallery of some of Alana’s images to this post soon!